Tactility in Tabletop Games
It's a huge part of their enduring appeal
2025/08/29, Zoe
In today’s world of hyper-realistic video games and VR that allow you to fully enter game worlds, why are tabletop games still so popular? The answer is that tabletop games provide a uniquely enriching experience, that’s never going to go away, no matter how much video games improve. That experience is shared play. It’s the feeling of sitting around a campfire with your friends and family, listening to a really good story. Everyone participates in the world-building, even though each person must create that world individually inside their own mind. This is far different from a video game, where every pixel of the world is rendered for you.

Spearhead war scroll card with unit-specific stats and special abilities
As we talked about in a previous blog post, creating and maintaining this shared world requires work (enforcing rules, remembering stats, updating the environment, etc.), and it’s not easy. Key to entering this state, besides proximity with fellow players, are the physical game pieces themselves. Tabletop gamers attest to the power of physical game tokens (cards, dice, minifigures, etc.) to draw them into the world of the game, making the experience more “real”. Rolling a giant handful of dice makes you feel powerful and adds to the drama of your attack. Slapping down a card you’ve kept hidden in your deck is a massively satisfying way to deploy a surprise ability. Personally, I love the feeling of sitting on a strategic development card in Settlers of Catan, mapping out my moves (holding my breath that everything goes according to plan), and then throwing it on the table in a dramatic reveal at the perfect moment. These tactile pieces invite you to suspend disbelief and enter that shared world. This hypnotic element is lost when tabletop games are made entirely digital, and it’s a big part of what distinguishes Scepter as a new type of gaming.

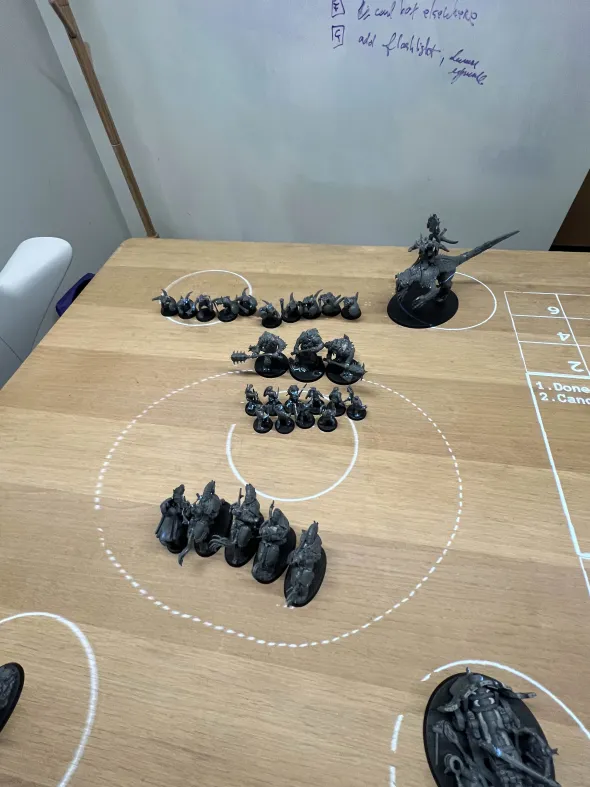
A fully painted Warhammer army and other physical game pieces
For Warhammer players, curating an army and painstakingly assembling and painting each minifigure is part of the fun. Some people collect and paint figures who don’t even play the game! (Maybe they would play if they had Scepter tho… :) ) That’s why it was so important for us to design Scepter to work with the pieces people already use. We also see Scepter as an opportunity to augment the experience of gameplay with physical pieces, by turning those pieces into responsive elements. Imagine if you could reveal a special ability card, throw it on the table, and immediately see its effects on your opponent. This is one of the features we’re currently working on. A card is detected in the video feed of a webcam and then we use computer vision techniques to identify which one it is. Our game engine gets a signal that this card has been deployed and responds accordingly. And then, BOOM! Real-life Yu-Gi-Oh!!

Physical game tokens are just as important to gameplay as the mechanics and rules. We want to augment that experience, not take it away. We’re creating an entirely new category of gaming: keeping the parts people love about tabletop games, getting rid of the parts people don’t like, and adding magical experiences that were never before possible. Our next demo will allow players to use physical cards with Scepter, and then physical dice is after that. So stay tuned!!
A Week of Milestones
2025/06/08, Zoe
The past week has been a whirlwind of company milestones for us! It started with us taking Scepter to our first ever convention!!

Playing Warhammer Age of Sigmar Spearhead on Scepter at Games of Berkeley
The convention was held at a local game store in the bay area, shout out Games of Berkeley! It was a huge moment for us, and definitely the most high-traffic event we have brought Scepter to yet. Despite a rocky start (mysterious new bug that turned out to be caused by a gpu driver issue), we ended up having a great weekend! It was awesome to see our vision for Scepter in action: seeing people learn how to play Warhammer on the fly, while having fun, and drawing a crowd of onlookers cheering on every dice roll.

Newbies learning how to play on Scepter
Next milestone: our first out of state trip! We've been busy fundraising so we can raise the money we need to bring Scepter to the next level, and yesterday Mark and I got back from a trip to NYC to talk to VCs! We had some great chats, and more importantly, great bagels. Really excited about what we have planned for the rest of the year…

Amazing dim sum meal we had our first night. Unfortunately didn’t take a pic of the bagels

The funky hotel we stayed at in NYC
The Two Types Of Work
2025/07/18, Mark
Imagine that someone made an adaptation of Pong (the old Atari game from the 1970’s) as a board game. This would be a strange thing to do, but bear with me. Two players sit across from each other at a table. They place down rectangular tiles (which represent their paddles). They place down a small disc-shaped cardboard token with an arrow on it (which represents the ball and the direction it’s moving).
Being a physical board game, play proceeds in a turn-based fashion through a sequence of rounds. A round starts with the ball moving in a random direction and ends when one of the players scores a point. Player-1 is responsible for randomizing the initial ball direction, so –
Player-1 rolls a 20-sided die (and gets 15)
Player-1 multiplies 15/20 * 360 degrees = 270 degrees
Player-1 uses a compass and rotates the ball token to 270 degrees
After this setup step, we enter the main phase of the round, where the players alternately move their paddle tiles back and forth trying to score points. The turn order within a round is randomized to give equal strategic advantage to each player, so the players will have a roll-off to determine who goes first –
Player-1 rolls a d6 (and gets 3)
Player-2 rolls a d6 (and gets 4, so Player-1 has to move first)
Now the players commit their moves, knowing that each paddle can move up to 1 inch per turn.
Player-1 decides they want to be on the left hand side of the board
Player-1 uses a ruler to measure an inch
Player-1 slides their paddle tile to the new location
Player-2 decides they want to move just slightly to the right
Player-2 uses a ruler to measure a half-inch
Player-2 slides their paddle tile to the new location
Now that the players have each moved their paddles, they need to update the position of the ball. In this game the ball moves 2 inches per turn, and it’s Player-2’s responsibility to update it.
Player-2 uses a ruler to measure 2 inches in the direction the ball token is facing
Player-2 slides the ball token forward
Start reading again here if your eyes have glossed over… :-)
I think you will agree that this game sounds rather tedious (and we haven’t even had to make the ball bounce off a wall yet). When you play Pong: the video game, a lot of this work is done for you by the computer. Of course, the computer doesn’t do all the work, since then the players would just be passively watching a movie. Let’s put the work into two categories:
Type-1 Work
Player-1 rolls a 20-sided die (and gets 15)
Player-1 multiplies 15/20 * 360 degrees = 270 degrees
Player-1 uses a compass and rotates the token to 270 degrees
Player-1 rolls a d6 (and gets 3)
Player-2 rolls a d6 (and gets 4, so Player-1 has to move first)
Player-1 uses a ruler to measure an inch
Player-2 uses a ruler to measure a half-inch
Player-2 slides their paddle tile to the new location
Player-2 uses a ruler to measure 2 inches in the direction the ball token is facing
Player-2 slides the ball token forward
Type-2 Work
Player-1 decides they want to be on the left hand side of the board
Player-1 slides their paddle tile to the new location
Player-2 decides they want to move slightly to the right
Player-2 slides their paddle tile to the new location
When you play Pong: the video game, you only need to do Type-2 work. You make strategic decisions about where to go, and then you execute your plan with some basic physical action (moving a joystick). When you play Pong: the board game, you need to do both types of work, because there’s no computer to do the Type-1 work for you. In almost every physical tabletop game, the players need to do both types of work.
For the most part, Type-1 work seems to be more tedious, and Type-2 work seems to be “the fun part.” It is useful to characterize it in a bit more detail though. Pong is an abstraction of the sport of table tennis. The “fantasy” of Pong is that you are playing table tennis. Consider this mapping –
Pong (Abstraction) —> Table Tennis (Fantasy)
Pong Player —> Table Tennis Player
Deciding where to move —> Deciding where/how to stand
Moving their joystick —> Moving their body/paddle
Each action of Type-2 work directly corresponds to what the player is doing within the fantasy of the game. Each action of Type-1 work corresponds to either something the environment should do “by itself” (a ball moving and bouncing), or to something which is an artifact of the abstraction (a roll-off is required to normalize turn-order advantage because the abstraction is turn-based).
As an aside, in this example all of the dice rolling happens to be Type-1 work, but this isn’t always the case. For example, rolling dice for an attack in D&D maps well into the fantasy as casting a fireball, or swinging an axe. That’s why Scepter will eventually support three different kinds of dice rolling (but more on this later).
As the amount of Type-1 work in a game increases, it becomes harder to maintain the suspension of disbelief. As the amount of Type-2 work in a game increases, players more easily enter the trance-like state of mind known as “group flow.”
If you’ve experienced group flow during a tabletop session then you already know how much fun it is. It really feels like visiting another world, and your friends are there with you (getting up to shenanigans no doubt).
If you haven’t experienced group flow during a tabletop session, you’re certainly not alone – it’s a fragile state of mind, and reaching it is hard work. It’s such hard work you might wonder if technology could do it for you – and we’re starting to see that yes, it can. Leveraging recent advances in the fields of robotics, artificial intelligence, and computer vision, we’re building Scepter, our platform and game console that will eventually automate all Type-1 work in tabletop games. What worlds do you want to visit?

Calibration: it’s how the magic happens
2025/07/04, Zoe
One of the most consistent and encouraging bits of feedback we’ve gotten is that Warhammer players want to ditch the measuring tape. It’s not like cards and dice, that add to the drama of playing the game, and make you feel more in it. This is something that’s just annoying. It takes you out of the flow, and it’s clunky. We’ve even had conversations with table-top game enthusiasts who have been too intimidated to try Warhammer because of the measuring element specifically.

Movement range bubble. No measuring tape required!
So how do we use our device to measure and display real-world distances on the table? It all comes down to calibration. To make it work, all of our sensors and the projector need to agree on what they’re seeing. On top of that, we need a way to convert between where the device thinks a point of interest is, and where it actually is in the real world. In the case of the cameras, we can get a location in pixel space of a model, but what does that mean for the real world location of that model? How can we convert between the two? With a calibration procedure!

Device camera view.
Calibration is also what allows us to bring to life the magic of pressing a “button” on the table. The lidar projects a flat sheet of IR light just above the table, and it can detect the location of objects that block that sheet. After calibration, we can localize those objects in the real world, allowing the device to see where you point on the table.

IRL view

Device view
To bring it all together, we need to calibrate the projector so that we can send graphics to the table and ensure that they actually display correct distances. Many projectors already have some form of correction so the image doesn’t look warped, but extra correction is needed for our setup because of how close the projector is to the table. Think about when you project onto a wall from a weird angle. The picture will probably look stretched out in some places and squashed in others. We can use calibration to warp the projection back into a square image. We need to ensure that a projected movement range bubble not only goes to the correct location on the table (centered around the unit about to move), but also that it accurately displays the unit’s movement range in every direction.

Before calibration

After calibration
And that’s how the magic happens! With all the recent advancements in autonomous vehicles, we’re living in a truly exciting time for augmented reality applications. Lidar and other robotic sensors are way cheaper and more accessible now. On the software side, calibration is what actually makes these sensors useful. It’s been really encouraging to see players react so enthusiastically to the distance range bubbles that our device displays. We can’t wait for you all to see the other new features we have in the works, stay tuned!


Evolution Of The Frame
2025/06/25, Mark
Scepter is eventually going to be about the size of an Xbox. You’ll be able to pull it off a shelf and put it on the kitchen table when it’s time to game. You’ll be able to throw it in your backpack and take it to your friend’s house.
But it isn’t that small yet. It’s still a prototype, so this is expected, but we are making steady progress. Here’s a look back over the past few months of design iterations on the frame (or physical body) of the device.

Design Iteration 0: Gantry
Two steel bars (leftover from a welding project), propped up on a bookshelf and a built-in shelf
Laser projector (meant for dance clubs and larger venues) balanced on top
Cheap webcams
Plenty of duct tape
This was a quick and dirty proof of concept. I hit my head on the gantry multiple times.

Design Iteration 1: Wooden Periscope
Two square mirrors
3D-printed connectors
Wooden frame, sloppily cut and screwed together
Laser scanner sits on table
Improved camera (not visible in this picture)
This was at least conceivably portable, although the mirror setup had a smaller addressable play-area, and caught self-shadows from the wooden frame. It was nice not having to duck underneath the gantry.

Design Iteration 2: Aluminum Periscope
80/20 rail instead of wood
More deliberate alignment of mirrors
Aluminum rail is much easier to work with than wood, especially in an apartment. Despite tweaking the mirror angles, I knew at this point that I would still have to do something to increase the addressable play-area. Curved mirrors was one possibility, but I wanted something simpler before going down that path.

Design Iteration 3: Aluminum Dog
3D-printed laser mount
Looks kind of like a dog
This was a short-lived one. The footprint was way too big. This laser scanner is over 10 lbs with unevenly distributed weight, which made me hesitate to just put it on a tripod…

Design Iteration 4: Tripods
3D-printed laser mount
Heavy-duty tripod
Camera on a separate tripod (not pictured)
This had a smaller footprint and was generally nice and simple, but there was a bit too much wobble, and the plastic mount eventually cracked and broke from the weight of the laser.
We could’ve gone with a mount made from metal, or with a smaller laser scanner, or with a heavier-duty tripod. There are tradeoffs with each of these.
Design Iteration 5: Angled-Mount Tripod
3D-printed laser mount that lets the tripod joint stay in it’s neutral position
Reduced wobble and shear on the plastic
I don’t have a picture of this one. It was extremely short-lived, but it did lead us to…

Zoe with the v6 frame
Design Iteration 6: Angled-Mount Rail
3D-printed angled laser mount
At this point you still couldn’t play a full game of anything on the device, just bits and pieces. There were a lot of software issues, like the reliability of model tracking. Still, we could start to get glimpses of a cohesive experience. We were getting ready to start doing demos.

Design Iteration 7: Ultra-Short Throw Multi-View (USTMV)
Traditional (non-laser-scanning) projector
Custom shaders to handle contrast and warping issues
Two cameras for improved model tracking
We had been talking for a while about the tradeoffs between laser-scanners and traditional projectors. Briefly: laser scanners are brighter, and projectors are faster and less regulated.
The path of least resistance right now is with traditional projectors, but we are still pursuing a design branch that uses lasers. I’m very excited to talk more about that in the future.

Mark, Zoe, and Kapi with the v8 frame
Design Iteration 8: USTMV On A Stool
Wider-fov cameras
A stepstool from Ace Hardware
This was the first device that we demo’ed. Because of how we were doing the on-table menus at that point, we had to get an extra 10 inches or so of elevation. A truly elegant solution.

Design Iteration 9: USTMV Scorpion
Better camera positioning
We also had improved camera handling on the software side, and no longer needed the extra height from the step stool.

Design Iteration 10: Pink Scorpion
3D-printed scorpion mount for further-improved camera positioning
3D-printed LIDAR mount
This brings us up to the present. With further-improved camera positioning and the additional use of LIDAR, the model tracking and the on-table menus feel much better than they did a month ago.
As we continue to make improvements on the software side, we expect the frame to continue to get smaller. In particular, some tracking-system improvements currently in the works will probably obviate the scorpion-style mount, and give us a more compact silhouette.